Testing your equipment at home
- May 5, 2024
- 5 min read
Updated: Mar 6
If you are new to the platform, it is recommended that you test one live stream with your streaming equipment ahead of time. This tutorial will guide you through setting up your first account, creating a racing team and drivers, and finally creating a 30-minute "My Races Live" stream event to ensure everything works smoothly. Grab your camera, and let's get started!
Creating a new account
If you don't have an account yet, follow these steps:
Go to portal.myraces.live and click on "Sign Up" to create a new free account.
A verification email will be sent to your email address. Once your email is verified you can login with your user.
Adding a new team and drivers
Creating a new team and drivers is required before creating any stream event. This information will be used to display the team's name and the current driver information in the stream overlay.
Go to Race Streaming>Racing Team and create a new team.
Go to Race Streaming>Drivers and add drivers to your team.
Creating a test stream
Now, you're ready to create a test stream. This step will automatically create a 30-minute-long unlisted YouTube Live video on the MyRaces Live YouTube channel that your camera stream will be sent to, together with the live race data overlay. If you need more time for your test, simply update the "End Time" field when creating the Test Stream. You won't be able to change the end time once it is started.
Go to Race Streaming>Steam and click on "Start a Test Stream".
Select your racing team, driver, and enter your car number. Optionally select a race data source and select a race event from the list of current events.
Click "Start" and wait a couple of seconds for the "Status" to show "Live".
Wait for up to 2 minutes for the "Infra" to show "Ready".
Configuring your camera
When the stream infra shows "ready", power on your streaming equipment and start live streaming:
Find the RTMP URL displayed under your newly created Stream Event:
Click on your test Stream Event> scroll down to the "CAMERA CONFIG" box.
Copy the full RTMP URL, for example: "rtmp://1234.myraces.live/1234/cam1"
In your streaming equipment:
For MineA5 Cameras:
Make sure you have configured the recommended live streaming settings first.
Then, to start streaming, click "Show QR Code for MineA5" and follow the instructions in the pop-up window on how to scan the QR Code with the MineA5 camera.
Alternatively, to start streaming, use the touch screen or the MLive App to navigate to the streaming channels. Then, under "Single Network Channel", configure the "Local chn-1" and:
Select the protocol: RTMP with encoding H.264 (H.265 not supported yet)
Paste the full RTMP URL in the "Streaming Address" field (including the /cam1 at the end!!)
Leave the "Stream code" field empty.
Save the address and/or click on "Start Streaming".
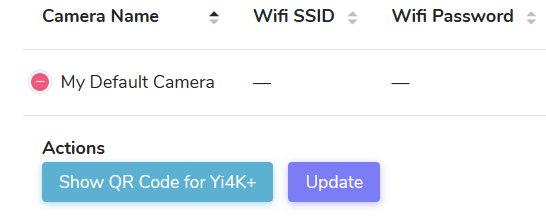
For Yi4K+ cameras, you can use the built-in "Show QR Code" button under Cameras>Default Camera (the camera you're using for that stream). Make sure to first update the Default Camera object with your WIFI SSID and Password.
- For other equipment/phone streaming app (LiveU Solo, Prism Live):
If your equipment requires both a "Stream URL" and a "Stream Key", remove the "cam1" from the main URL and use "cam1" as the "Stream Key":
RTMP URL: "rtmp://1234.myraces.live/1234/
Stream Key: "cam1"
Some applications (ex: StreamLabs) require removing the last backslash at the end of the RTMP URL:
RTMP URL: "rtmp://1234.myraces.live/1234
Stream Key: "cam1"
Making sure you are "Live"
Scroll down to the "Live Streams Health" under your Stream Event and use the refresh icon to see the graph below. The "orange line" representing the input from your camera stream should start spiking up after +- 20 seconds.
Note:
If the orange line stays to zero, it means we're not receiving the video stream from the camera. Go back to your camera/phone to stop the live stream, double-check your network connection and the configured RTMP URL for any typos, and try again.


Where to watch your stream?
Your test stream will be sent to MyRaces.Live YouTube channel with "unlisted" visibility so only you and the people you share the link with can see the video.
The link to the video can be found under the " STREAM DESTINATIONS" box or, you can watch the video from the Stream Event page, by scrolling down to the "Live Streams Video" section, under the "Live Streams Health", and clicking on the refresh icon.
The video latency is expected to be between 15 to 20 seconds.
If you have a Pro Subscription, you can navigate to the "Low Latency" page, click on one of the buttons next to you stream event: "Start (With Overlay)" or "Start (Without Overlay): and watch your live stream with a low latency: 2-3 seconds.
The Default Overlay
With the free software version, the live stream overlay is always the same and cannot be changed. If you want to be able to customize the overlay (ex: removing our watermark, adding your sponsor's logos, and moving things around, you'll need to get the premium or pro subscription.
When no race data source is selected, the default overlay will look like this:

We display the local time, stream event name, team name, current driver information (country flag, car number and name), as well as the "warmup" flag.
When you select a Race Data Source, you will see the overlay changing to this:

The live race information is automatically populated based on the selected Race Data Source and selected Race Event.
You can update the Race Data Source at any time, even when the Stream Event is live.
Additional tests you can do while the stream is live
Here are some additional tests you can perform while the stream is live. These actions will trigger an automatic update of the video overlay:
Update your team and driver information (click on the stream event, then on the edit icon located at the top right corner of the "My Team" box).
Pick a race data source and a live event. Find a car number that is participating in that race and use that number as your stream car number to discover how the live race data is displayed (click on the stream, then on the edit icon located at the top right corner of the "Race Event" box).
Test the Pause/Resume actions to discover how to hide your camera video input stream temporarily and send custom messages to your audience. This feature can be used before the race start to share the race schedule or in between race sessions to announce when the next session will take place.
Note: It may take up to 20 seconds for your change to be reflected in the video overlay.
Ending the Test Stream
The test stream will stay up for 30 minutes until the indicated stop time, after which, it will start to tear down and be moved under the "Past Streams" tab. It's important to know that when a stream is past, it cannot be used anymore; therefore, you should only end a stream event if you're completely done with your live stream. If you want to end the stream earlier than the stop time, you can use the button "End Stream".
Now that you have tested your first stream, you are ready to learn how to create a real stream for your upcoming race weekends and experiment with the more advanced features.
Ready to go Live? Do this!
Follow this next tutorial


Comments